Browser abandonment emails are sent to visitors who view a product on your eCommerce store but don’t add it to their cart or make a purchase. These emails track the visitor’s behavior on your website or store.
Today, I’ll walk you through the steps to set up a Browser Abandonment Flow in Klaviyo.
First, you need to ensure that your tracking code is working correctly. To do this, go to the Metrics section in your Klaviyo account, scroll down, and look for the “Viewed Product” metric. If you see a line indicating activity, your product tracking is functioning properly. However, if you see a flat line at zero, it means your tracking isn’t working and needs to be fixed.
Start by clicking on “Setup Web Tracking” and following the instructions, or you can ask your developer to take care of it. When everything is set up correctly, a graph should appear, confirming that it’s functioning as expected.
The next step is to go to Flows and create a new flow. Name it something like “Test Flow Browser Abandonment.”
The action will be set under Metrics with product view filters, and you can add additional filters if you choose.
Next, we’ll set a time delay—let’s say 999 days instead of the typical 4 or 6 hours, just to prevent the email from being sent. Then, configure the email by choosing a template, selecting it, and saving the content.
At this point, I don’t expect there to be any data, so I’ll handle it manually and turn off smart sending. Then, I’ll back-populate the flow to trigger it with the available information.
Even though there’s no information yet, let’s go ahead and try it. Click “Edit” because the next step involves creating the trigger, setting the delay, and creating the email. In the email, we’ll need to set up specific blocks. What blocks am I referring to?
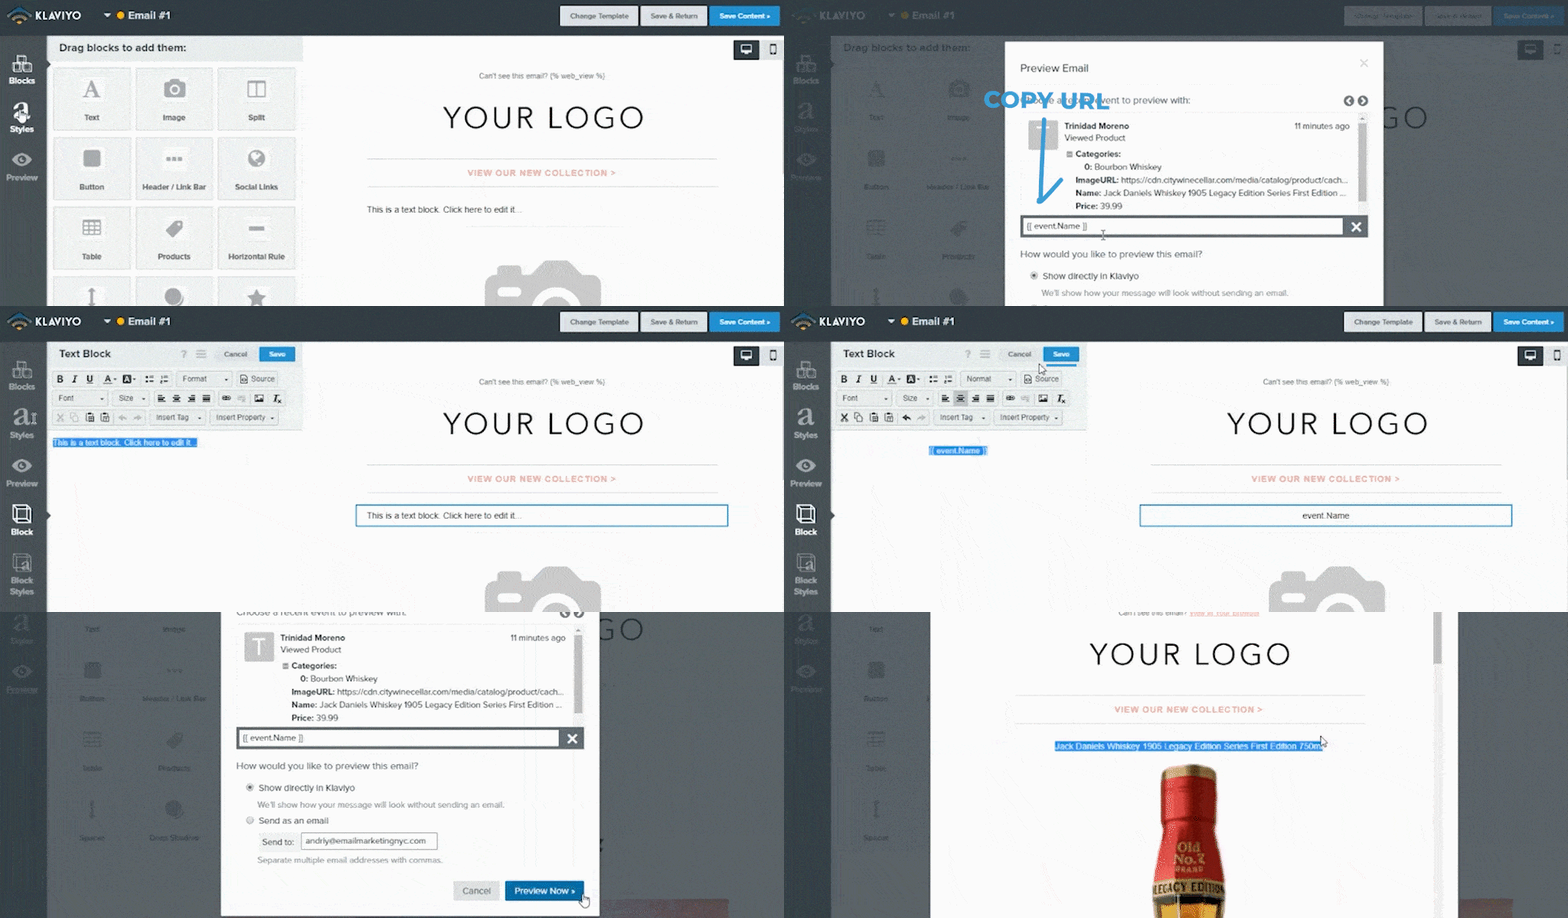
First, let’s add a text block, and then an image block. Save it and preview. As you can see, it’s already showing data for what the person viewed but didn’t purchase. Next, we’ll add the image URL.
For this part, I think there might be an issue with the images. So, here’s what you do: click on “Preview”—sorry if I’m going too fast. In the preview, you’ll see an image URL or something similar. Copy that URL, cancel the preview, click on the image, and then click on “Placeholder.” Paste the URL there, and adjust the image width—let’s set it to 250 since it wasn’t displaying properly before. Now, it should be showing correctly.
Let’s preview it. Yes, it’s displaying the correct image. Now, we need to add the title. We have the name right here, so let’s place the title—oops, preview again—and add the title here.
You already know how to add text—just click here and adjust the font, size, and color.
Now, creating the preview might take some time—I’m not very patient, but it’s ready. As you can see, it shows the product name and image. Let’s try a few different examples; the text and images should update accordingly.
The last thing to add is any other information you want to include, such as product details, price, special price, or SKU, though you may not need to. Lastly, you’ll want to include a link to the specific product. How do you do that?
So for the last part, as I mentioned earlier, you’ll want to include the event URL. This way, when someone clicks on their name or the image, they’ll be redirected to the specific product page instead of the homepage or another page. We’ll set up a dynamic link that changes based on the product they viewed. Let’s set that up—now, if we preview it, you’ll see it works. When clicked, it redirects to the correct product page.
And that’s how you create a Browser Abandonment Flow and add Browser Abandonment blocks to your emails.